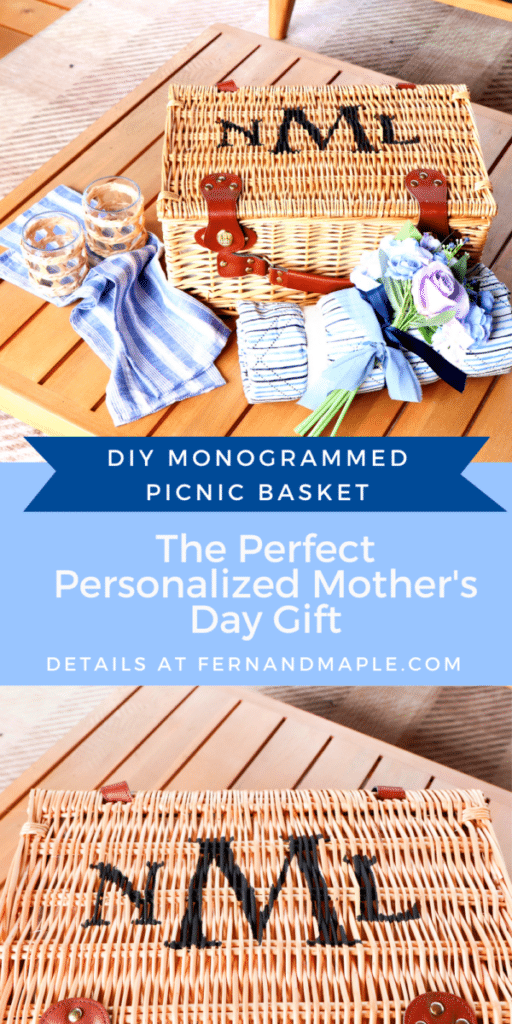
If you’ve been searching for a Mother’s Day gift that feels genuinely thoughtful — the kind she’ll actually use and love rather than tuck away in a drawer — this DIY monogrammed picnic basket might be exactly what you’re looking for.
I spotted a plain rattan picnic basket at Michaels and immediately had an idea for personalizing it. A Cricut-cut cardstock monogram stencil, a little chalk paint, and about 20 minutes later I had a personalized monogrammed basket that honestly looks like it came from a boutique gift shop. The kind of thing you’d pay a lot of money for online. We’re making it ourselves — and it’s so much easier than it looks.
You can get everything you need in one place – I shopped at Michaels for this project and you’ll find my full shopping list here Mongram Basket Shopping List
Why This Makes the Perfect Personalized Mother’s Day Gift
There’s something about a personalized gift that hits differently. It tells the person you made it specifically for them — not just picked it up on a last-minute run. A monogrammed picnic basket does exactly that, and because it’s functional it’s the kind of gift that gets used over and over again long after Mother’s Day has passed.
What I love most about this project is how adaptable it is. Change the monogram style, swap the ribbon color, adjust what goes inside — and you have something completely different every time. I’ve included a whole section of variations below, but the core technique stays the same whether you’re making this for Mother’s Day, a summer hosting gift, a bridal shower, or just because.
Watch the Full Tutorial
Before we get into the step-by-step, here’s the full tutorial reel so you can see exactly how it comes together from start to finish. Sometimes seeing it in motion makes all the difference!
Don’t forget to save this for later — and follow along for more DIY gift ideas and party inspiration.
What You’ll Need
For the monogram:
- Rattan picnic basket
- Cardstock
- Cricut machine (or pre-cut monogram stencils — more on this below)
- Chalk paint
- Stencil brush
- Painters tape
- Double-sided tape
- Fine detail brush
To fill the basket:
- Ribbon
- A bottle of bubbly
- Napkins
- Insulated glasses
- Picnic blanket
- Florals
Why Chalk Paint Works So Well on Rattan
Before we get into the steps, a quick note on paint choice — because it genuinely matters here.
Chalk paint is the best option for stencilling on rattan because it adheres beautifully to natural, textured materials without any primer or prep work. It dries quickly, has minimal brush strokes, and gives a matte finish that looks intentional and high-end on natural fibers. Regular acrylic paint can work but tends to sit on top of the surface rather than bonding with it, which means it’s more prone to chipping on a textured surface like rattan.
Stick with chalk paint and you’ll get clean, lasting results every time.
I also recommend finishing with a sealing spray for a long lasting and robust look.
How to Make a DIY Monogrammed Picnic Basket
Not a reader? Jump back up to the video tutorial above — it walks through every step in real time!
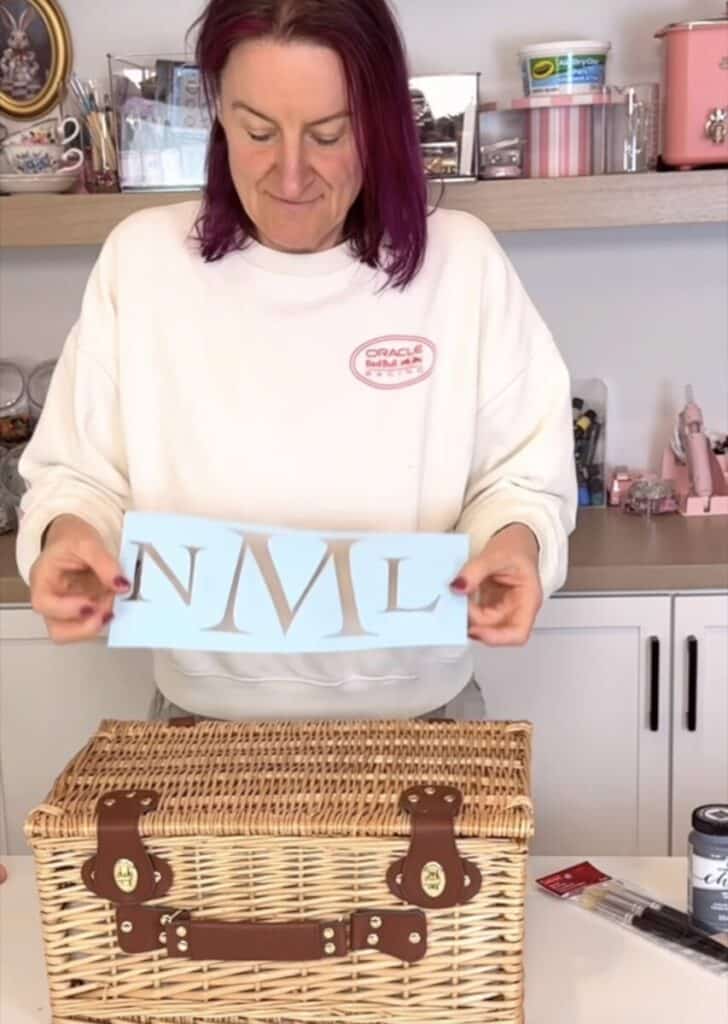
Step 1: Cut Your Monogram Stencil
Using your Cricut, cut your chosen monogram or initials from a piece of cardstock. I used a classic serif font for a timeless look — but this is completely personal. Script fonts, block letters, a single large initial — it all works beautifully on rattan.
The cardstock becomes your stencil. The cut-out letters are what you’ll paint through.
No Cricut? No problem. Michaels carries pre-cut monogram stencils that work just as well — head to the craft aisle and you’ll find exactly what you need.
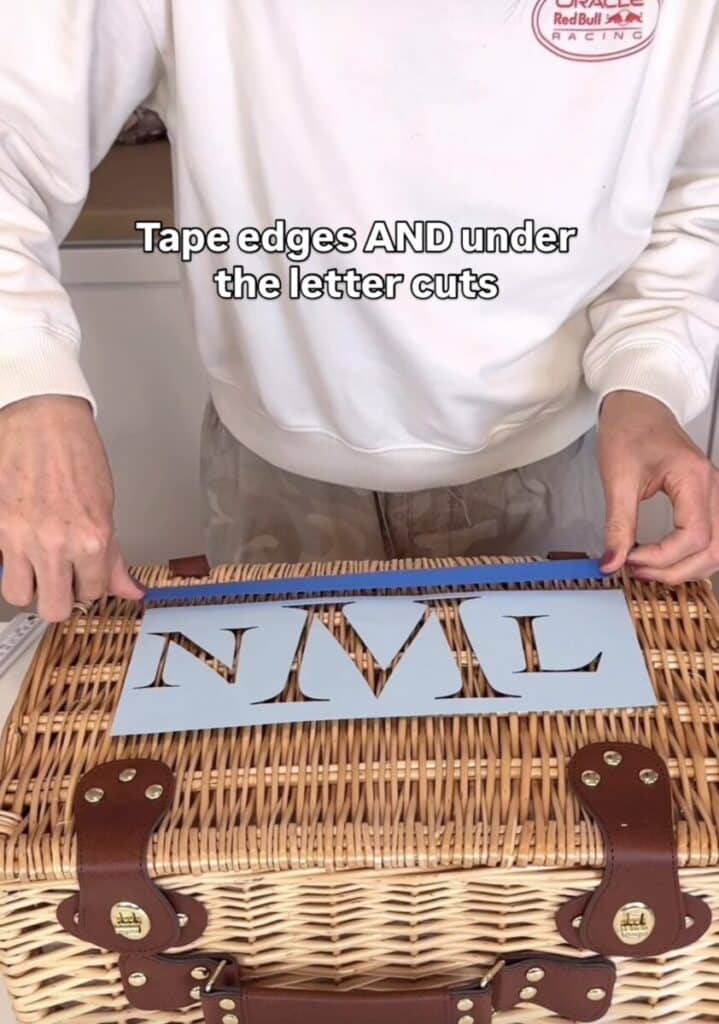
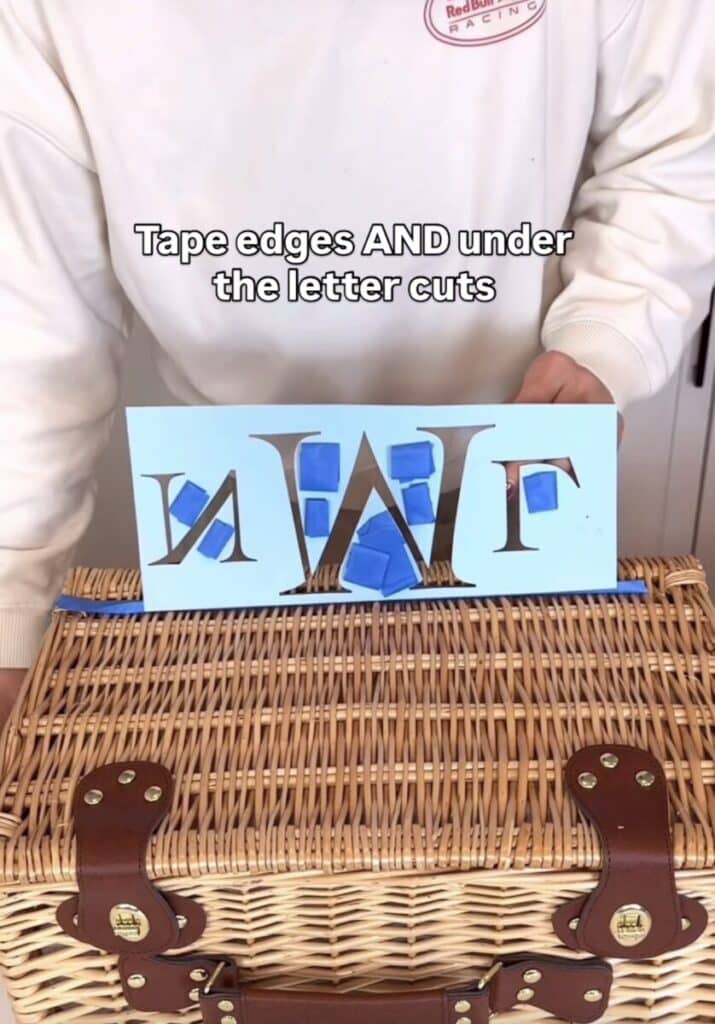
Step 2: Secure the Stencil
This is the step that makes or breaks a clean result — and I have a tip that genuinely changed everything for me.
Tape around the outside edges of the stencil with painters tape as normal. But then — and this is the trick — use small pieces of double-sided tape underneath any interior letter cuts too. Letters like B, D, O, P, and R all have interior islands that will lift during painting if they’re not secured. Paint bleeds underneath lifted edges and gives you fuzzy, uneven letters.
Press down firmly on every part of the stencil before you start. On a textured surface like rattan, you want those edges as flat and tight as possible.
Step 3: Paint the Monogram
Load your stencil brush with a small amount of chalk paint — less than you think you need. Use a gentle dabbing or stippling motion rather than brushing side to side. Brushing pushes paint under the stencil edges. Dab straight down with even pressure across each letter.
I also press down lightly on the stencil with my free hand as I paint each section. It keeps everything tight to the surface and gives you crisp, clean edges even on the rattan texture.

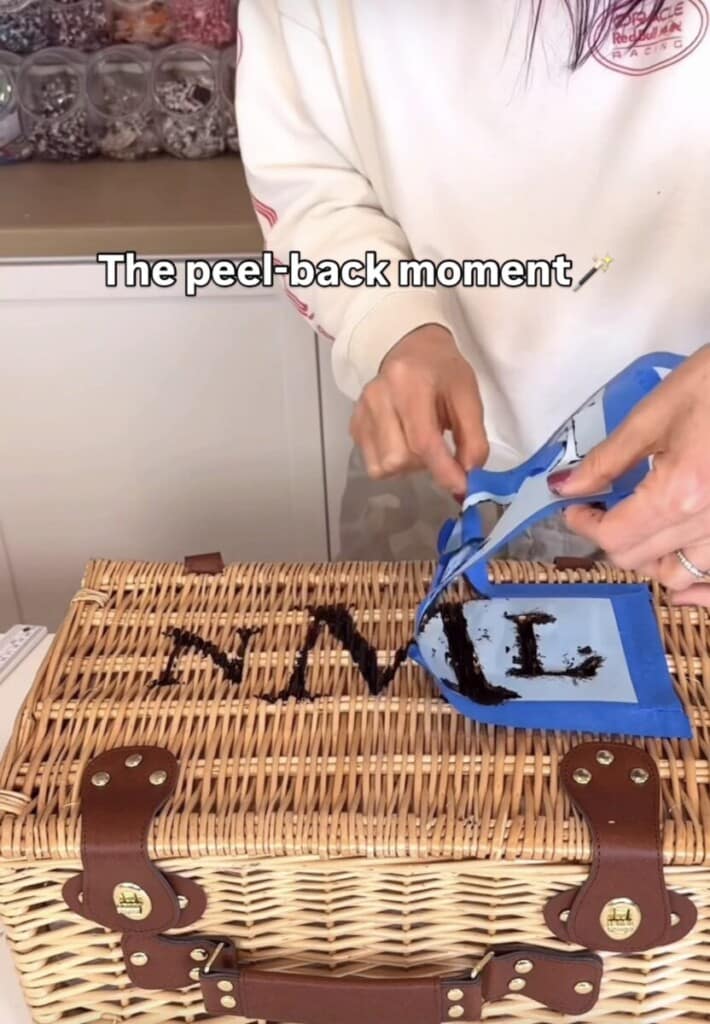
Step 4: Peel Back the Stencil
This is the moment. Peel back slowly and steadily from one corner, keeping the stencil as flat as possible as you lift. A slow peel gives you cleaner edges than a fast one — take your time here.
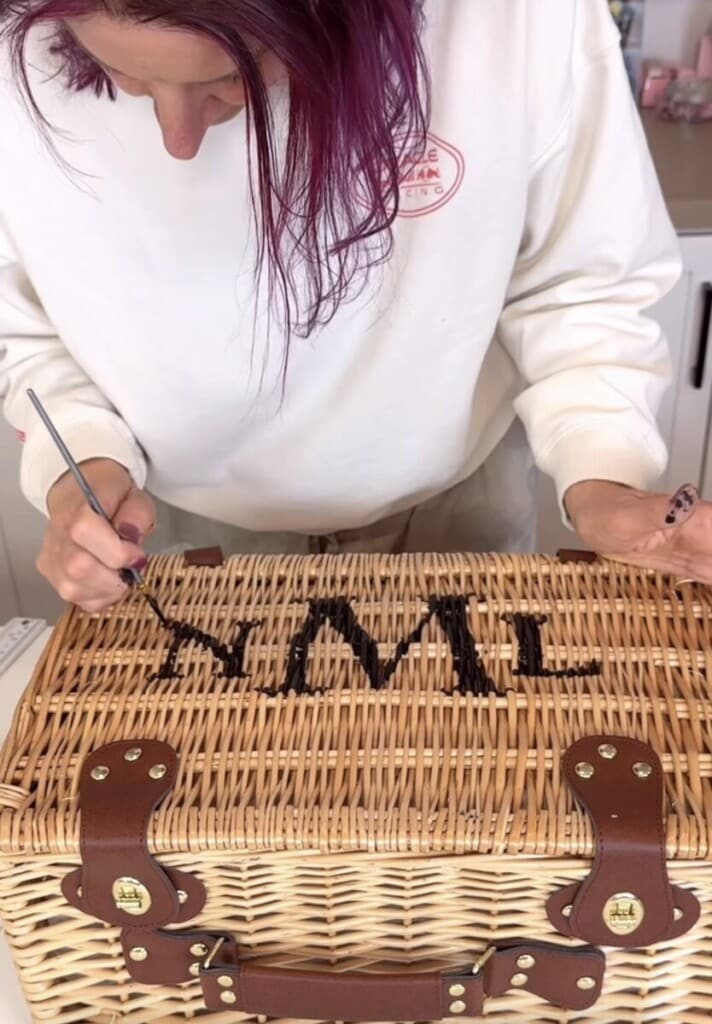
Step 5: Touch-Ups
Once the stencil is off, use your fine detail brush to clean up any edges that need a little attention. The natural texture of rattan creates some variation — a small amount of this actually looks beautiful and gives the monogram character. You’re just tidying the obvious areas.
Let it dry completely before moving on to filling the basket.
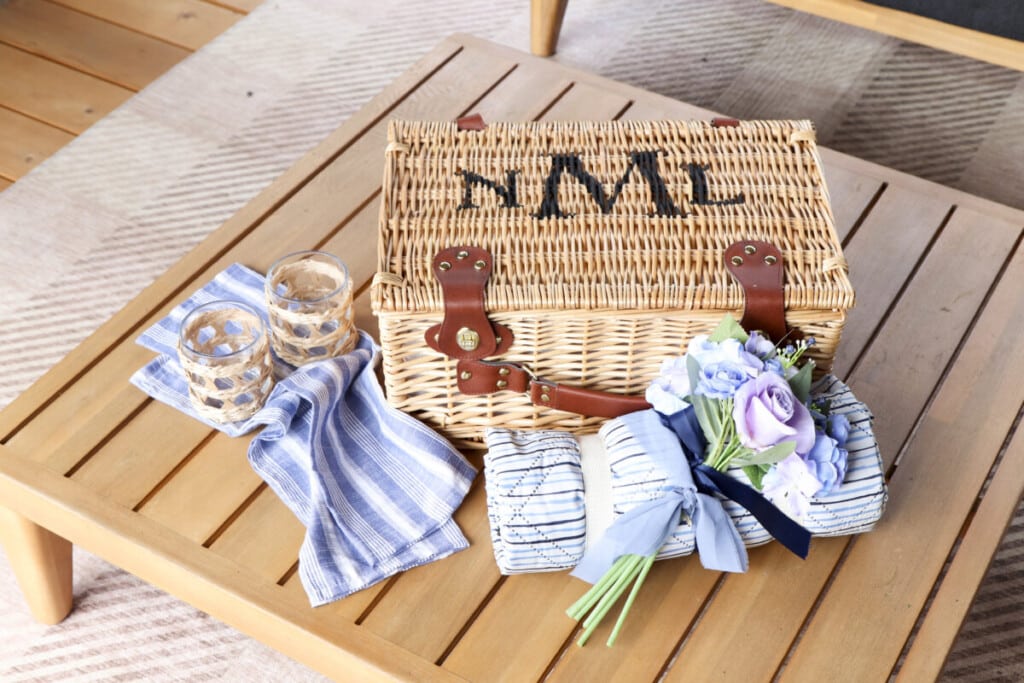
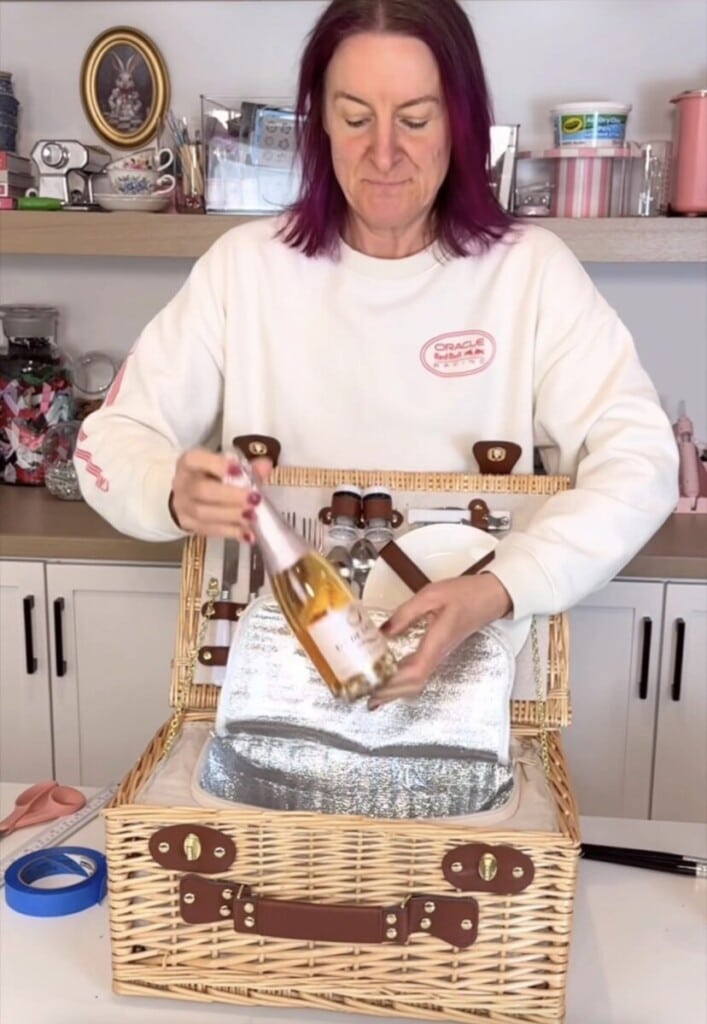
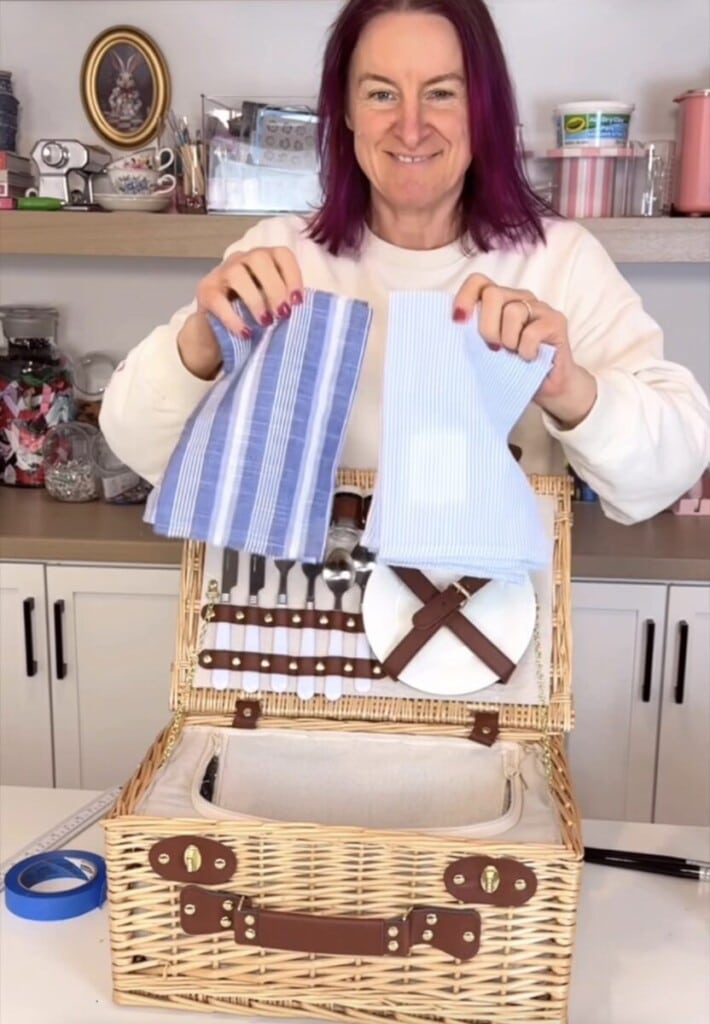
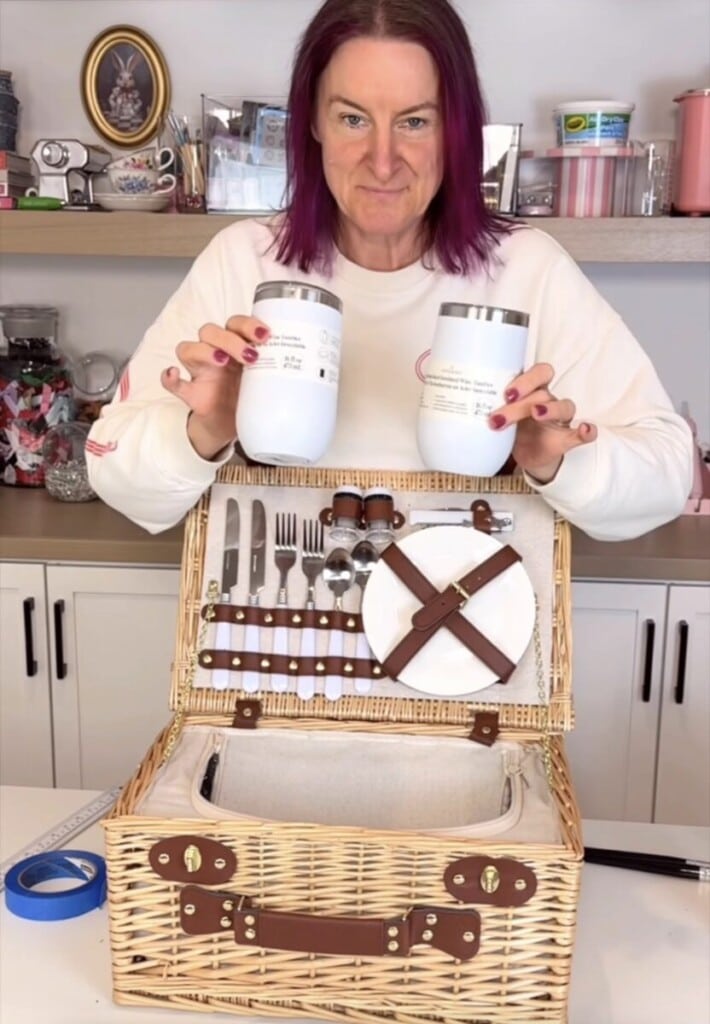
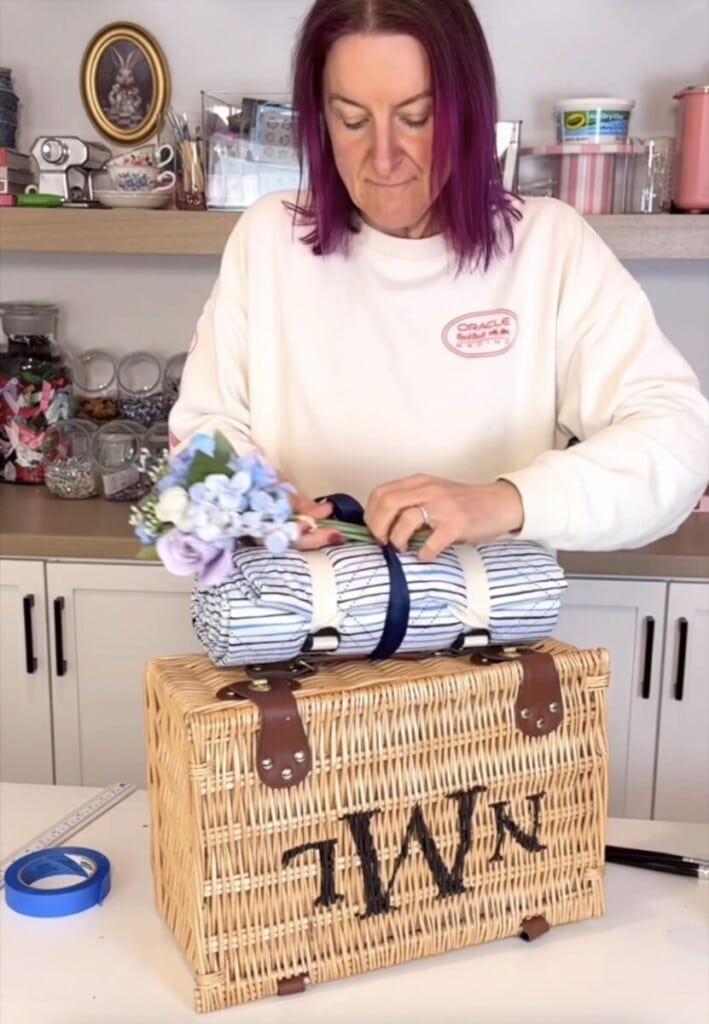
Step 6: Fill the Basket
Here’s the part I loved most. The basket already comes with plates and cutlery inside — which I genuinely loved discovering — so you’re halfway to a complete gift before you’ve even added anything.
I added a bottle of bubbly, napkins in a coordinating coastal blue, and insulated glasses that matched the color palette perfectly.
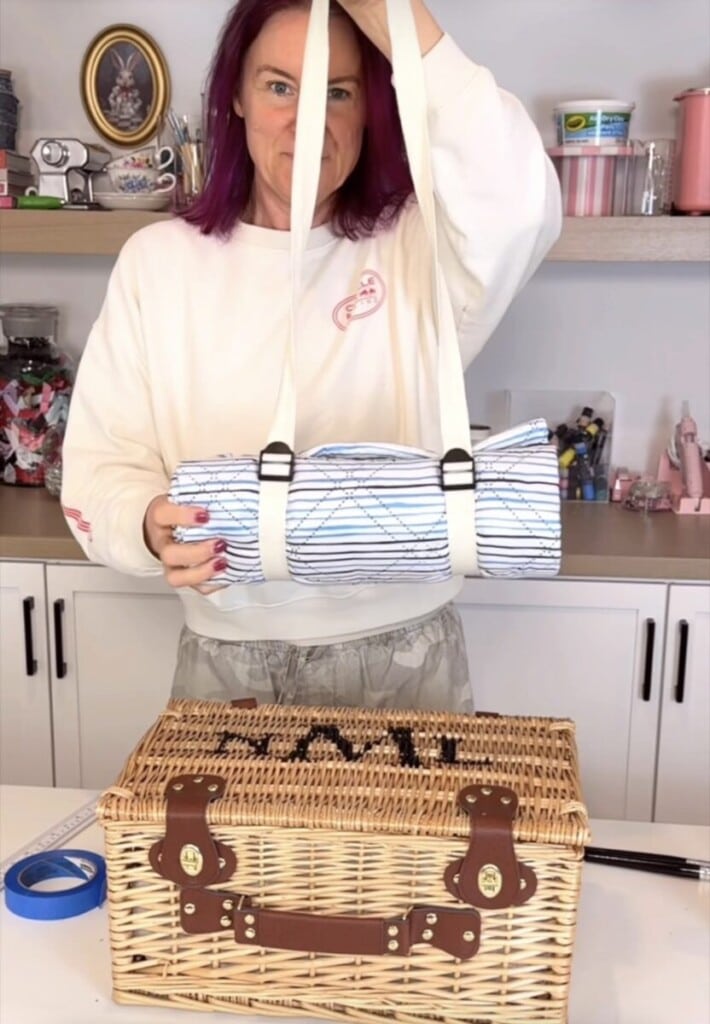
Then I tied a picnic blanket onto the handle with ribbon and tucked in faux florals for the finishing touch. The florals are the detail that takes it from lovely gift to something she will absolutely remember.
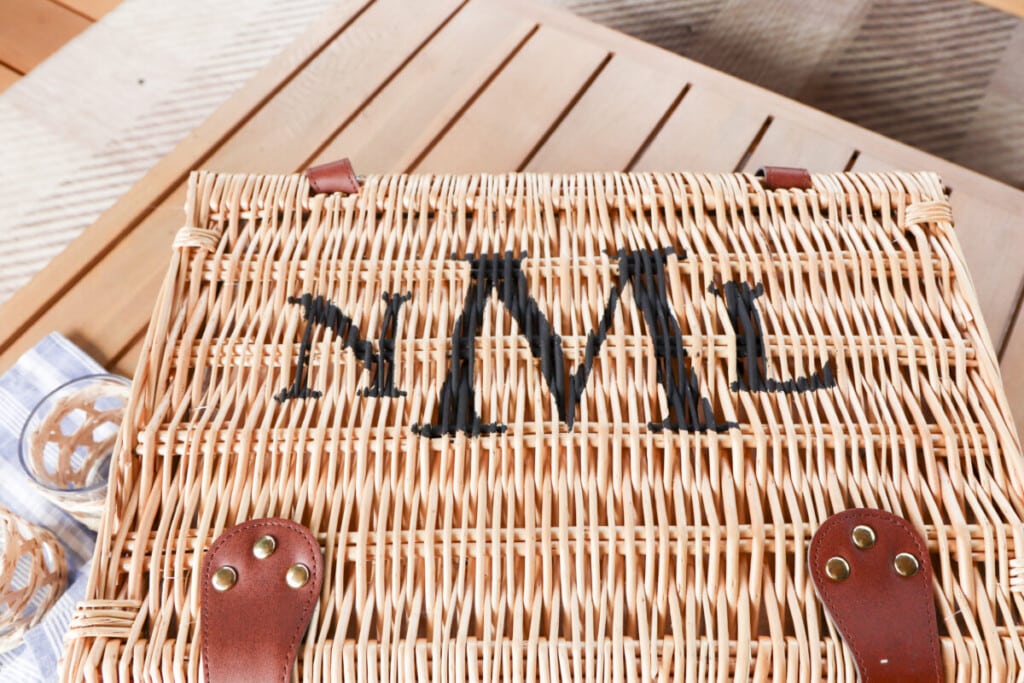
The Finished Gift
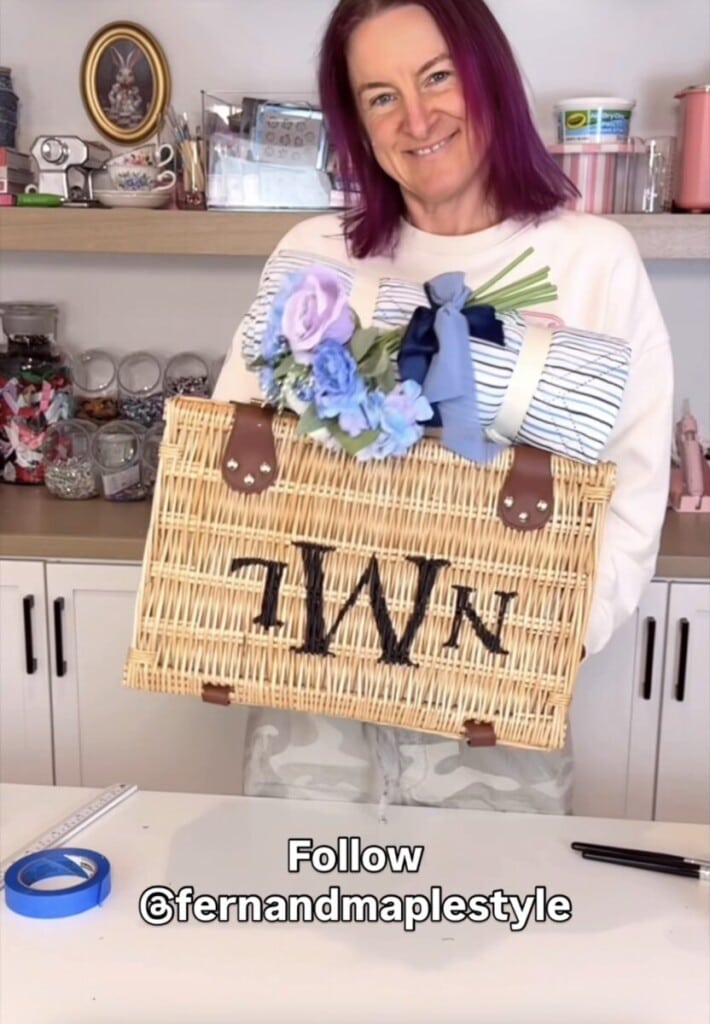
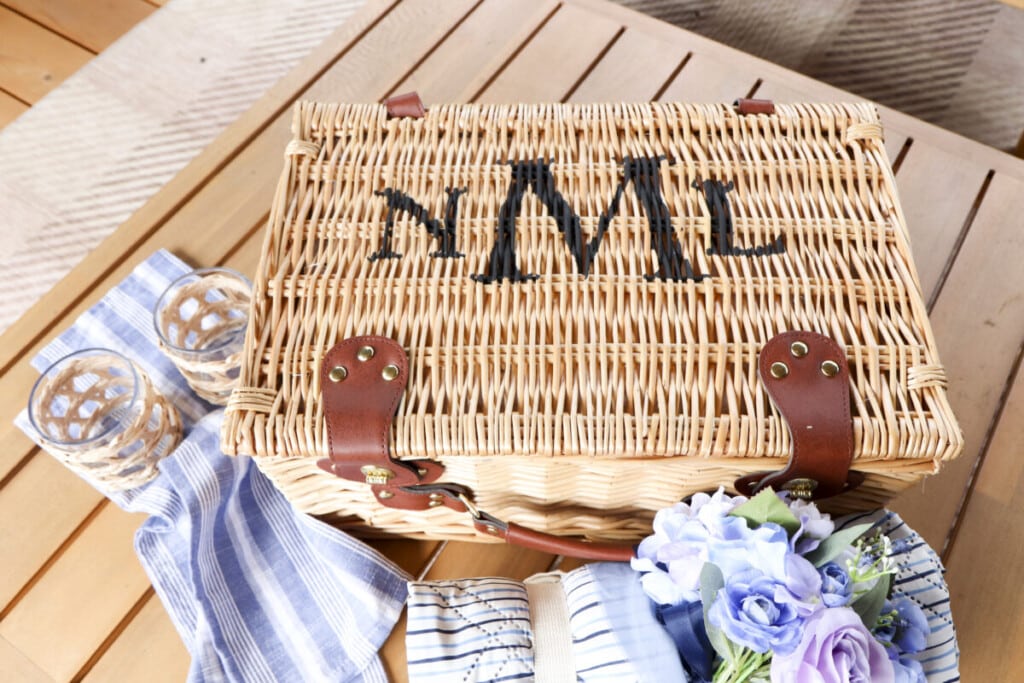
I styled the finished basket outside and it looked even better than I imagined. The black monogram against the natural rattan, the navy and coastal blue linens, the purple florals — it all came together into something that feels genuinely special and completely personal.
This is the kind of gift that gets photographed. The kind that gets shown to everyone. The kind that gets kept for years.
More Ways to Personalise Your Picnic Basket Gift
One of the things I love most about this project is how easy it is to make it completely your own. A few simple swaps and you have an entirely different gift.
- Other initials vs three-letter monogram – a single large initial in a bold font feels modern & graphic. A couples initials with a “&” betweem, for example “D & N” is great for an engagement or wedding gift. Or stick with the three letter monogram that feels classic and traditional. All are beautiful!
- Change the paint color — white chalk paint on a natural rattan basket is clean and fresh. Gold would be stunning for a bridal shower. Navy for a nautical theme.
- Swap the florals — pastel pinks and whites for a classic Mother’s Day feel. Bright sunflowers for a summer hostess gift. Deep burgundy and greenery for something more sophisticated.
- Adjust the contents — this works just as beautifully filled with tea and shortbread, spa products, a coffee lover’s kit, or a book and candle for a reader. The monogrammed basket is the gift — what goes inside is just the bonus.
- Try it on other materials — this same chalk paint stencil technique works on wood, fabric tote bags, and unfinished wood boxes. The Cricut stencil method is the same every time.
Frequently Asked Questions
Can I do this without a Cricut? Yes — absolutely. Michaels carries pre-cut monogram stencils in the craft aisle that work just as well. You don’t need a cutting machine to get beautiful results. Just make sure to tape down thoroughly, including underneath any interior letter cuts.
What kind of paint works best on rattan? Chalk paint is the best choice for rattan. It adheres to natural fibers without primer, dries quickly, and gives a clean matte finish. Regular acrylic paint can work but is more prone to chipping on textured natural materials.
How do I get clean edges when stencilling on rattan? The key is double-sided tape underneath interior letter cuts, plus pressing down firmly on the stencil as you paint. Use a stippling motion with your stencil brush rather than brushing side to side, and work in light layers rather than one heavy coat.
How long does chalk paint take to dry on rattan? Chalk paint dries to touch within 20–30 minutes in normal conditions. I’d recommend leaving it at least an hour before handling or filling the basket, and avoiding any contact with moisture for 24 hours while it fully cures.
Do I need to seal it after I finish painting? Yes! I recommend spraying it with a sealant once complete to ensure no chipping in the future.
Does this work on a dark stained basket? Yes — use white chalk paint instead of black for a beautiful contrast on a darker surface. The technique is exactly the same.
Filling the basket
What do you put in a picnic basket gift? For this Mother’s Day picnic basket I went with bubbly, napkins, insulated glasses, a picnic blanket, and faux florals — all from Michaels. But it’s completely customizable. Think about what the recipient loves: tea and shortbread, spa products, a coffee kit, wine and cheese accessories, or a book and candle. The monogrammed basket is the star — what goes inside is a bonus.
Shop This Project
Everything I used for this project is linked in my full shopping list HERE I’ve put it all together in one place so you can find the basket, chalk paint, stencil supplies, and everything that goes inside without hunting around
You can also browse my Amazon Shop for individual items.
You Might Also Like
Happy Gifting!
This post was created in partnership with Michaels. As a blogger, I sometimes receive compensation and/or products in exchange for my styling and crafting services. I also may earn a small commission from any sales that result from affiliate links on this page. As always, all project ideas and any opinions expressed here are my own. For further information on our disclosure policy please check out our disclosure page.
PIN FOR LATER:
")


Leave a Reply